does cost a lot of time and money.
of UFM please make a donation!
INSTALLATION GUIDE
Ultimate File Manager is designed for Microsoft Windows platform and is distributed to the end user as installer written in NSIS and Delphi CE. Ultimate File Manager installer allows for easy and quick installation of selected components (a properly configured file manager, plug-ins/add-ons that extend its functionality, and appropriately selected external applications), with the option of choosing the installation mode, choosing the components to install, etc.
This document shows how to install Ultimate File Manager. Installation process is simple and intuitive. UFM installer copy all required files and configure the system accordingly. Ultimate File Manager can be run on a 64-bit system. You can use either the Standard or Portable Installation mode.
UFM installation process consists of several steps, which are described in detail below (default installation of UFM 12.7 on the Windows 11 operating system (Polish language) with a dark theme).
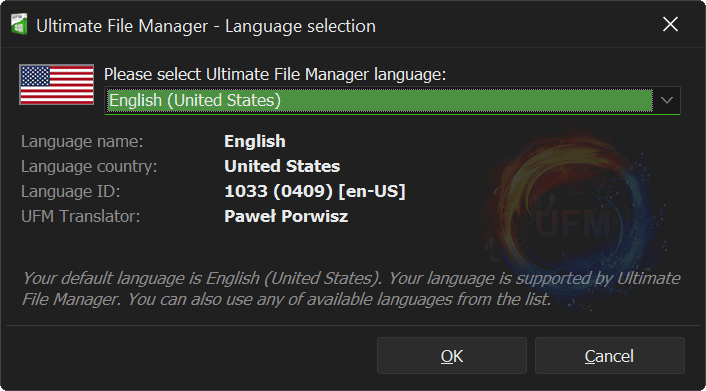
1. LANGUAGE SELECTION
First window we see after starting UFM installer is Language Selection Dialog. We can choose between English (which is selected by default in the English version of Windows) and other supported languages. We confirm language selection by clicking „OK” button (clicking „Cancel” button aborts installation).
Note
To be able to run UFM Installer you have to confirm Administrator Elevation in the UAC (User Account Control) prompt.
In Portable Installation, language selection dialog will always appear, while in Standard Installation it will only appear during the first installation (in Update Mode - installation of a newer version over an existing one - it will use language defined in previous installation).
If you want, you can help Translate Ultimate File Manager into your language. All languages of Total Commander and Multi Commander File Managers are supported, but only a few of them are fully translated and therefore official. You can change this, you can devote your time and skills so that everyone else can use their favorite file manager even more efficiently. UFM Translation Manager is a special tool that can help with translation. It can be found in the project installation directory (\UFM\LANG\TranslationManager.exe). You can also simply open it using the „Ultimate File Manager” menu of the File Manager). It allows you to manage your translation files and test them in a real application/file manager.
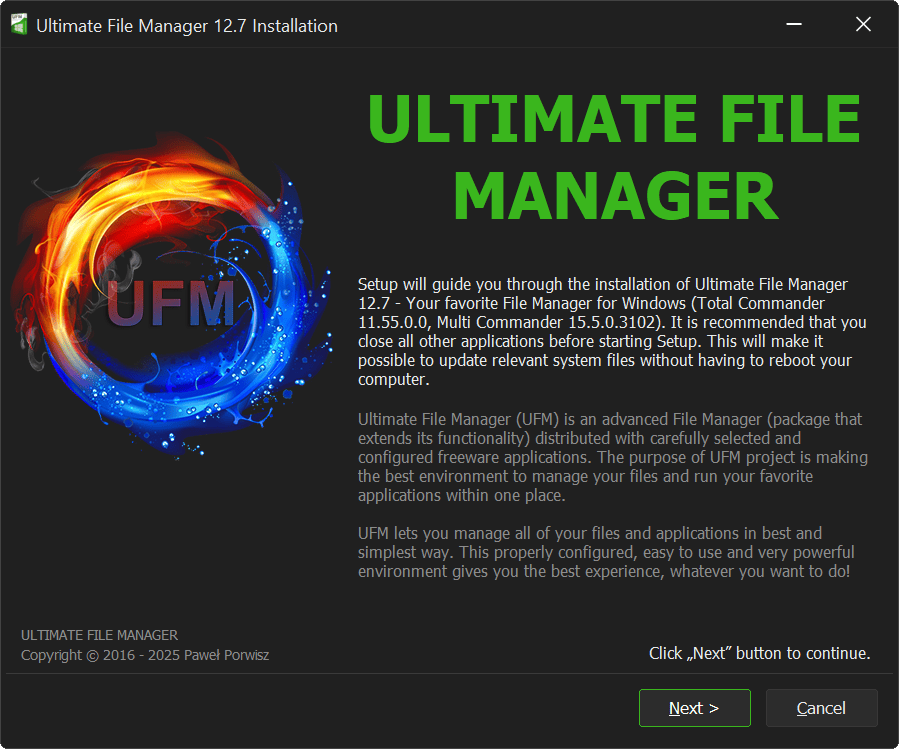
2. WELCOME PAGE
The first page of UFM Installer is Welcome Page. It is informative. Here we will find out what is being installed - the best file manager for the Windows platform.
Ultimate File Manager (UFM) is an advanced File Manager (package that extends the functionality of File Manager) distributed with carefully selected and configured freeware applications. The purpose of UFM project is making the best environment to manage your files and run your favourite applications within one place. Main application of the project is well-known and appreciated Total Commander File Manager (shareware) or its freeware equivalent Multi Commander. UFM lets you manage all of your files and applications in best and simplest way. This properly configured, easy to use and very powerfull environment gives you the best experience, whatever you want to do!
Clicking „Next” button allows you to go to the next page („Cancel” button aborts the installation - I won't mention it anymore).
3. INSTALLATION TYPE
Next page of UFM Installer is the Installation Type page - Ultimate File Manager supports two types of installation - Standard (default) and Portable. They differ from each other fundamentally and determine how the entire package works.
• Standard Installation
UFM installer in Standard Installation mode (sometimes called Normal) allows for full integration with the Operating System and Windows shell (File Explorer) - you can create shortcuts on the desktop, in the start menu, on the quick launch bar, you can pin the UFM icon on the Quick Access Bar or in the This PC View. You can also add command to context menu of folders, files and drives. You will create the appropriate entries in the Windows registry.
• Portable Installation
UFM installer in Portable Installation mode copies all files and settings to the installation directory (it can be run directly from a portable medium, such as a pendrive or external drive). There is no direct interference with the operating system - no shortcuts are created, no data is saved in the system registry, etc.

Note
In portable installation mode, some external applications may still save data in the user directory.
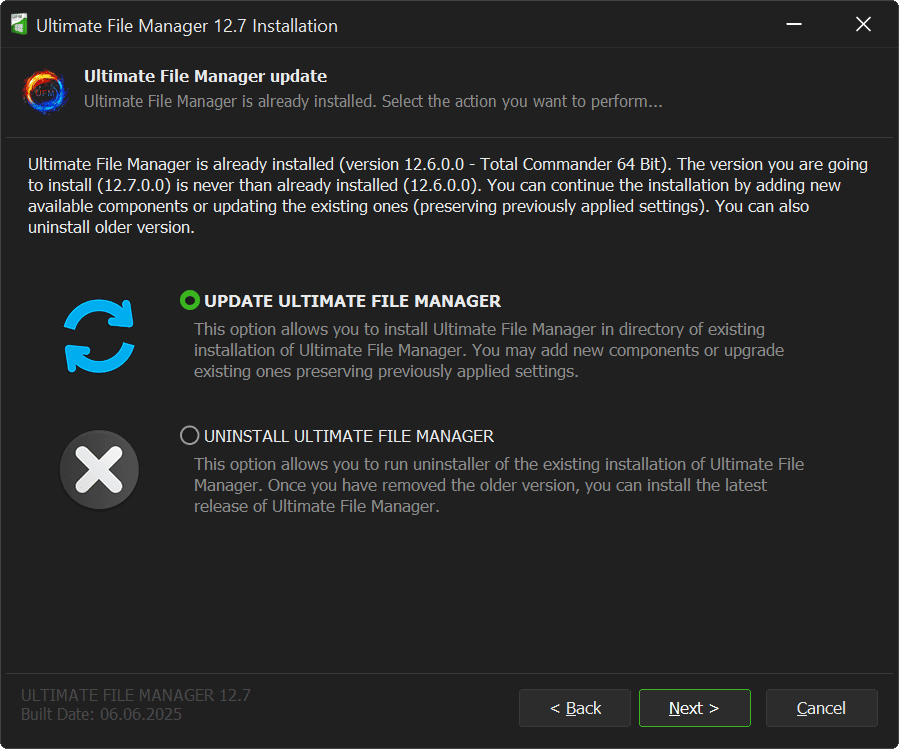
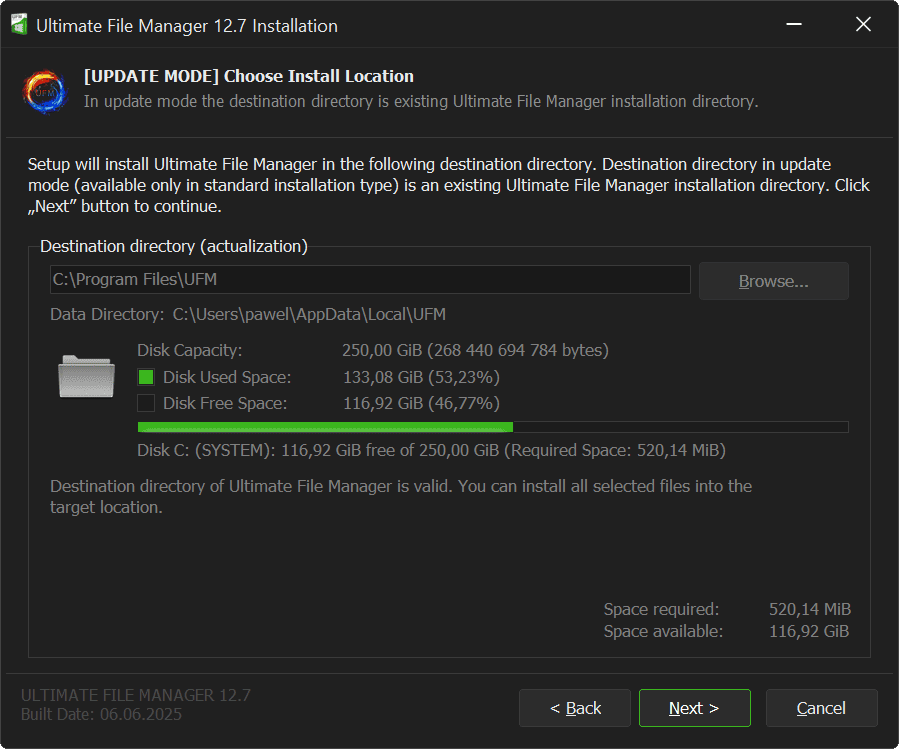
4. ACTUALIZATION PAGE
Next page of UFM Installer is Project Update page. This page is displayed only in the Standard Installation mode, when Ultimate File Manager is already installed on the user's disk. We can decide whether we want to update the existing installation of the Ultimate File Manager package or whether we want to remove (uninstall) it from the system and install newest vewrsion (appropriate options are set based on the detection of the Ultimate File Manager version, installation type and architecture).
• Ultimate File Manager Update
Selecting Ultimate File Manager Update option sets the installer to Update Mode. You can then add new components, remove or update existing components (applications, plugins, etc.). No user configuration files are modified (Note: File Manager menus and button bars are recreated and overwritten!).
• Uninstallation of Ultimate File Manager
Selecting Ultimate File Manager Uninstall option closes the current installer and runs the uninstaller for the previous (already installed on the user's disk) version. Once all the files of the existing installation are removed, you can install the latest version of Ultimate File Manager.

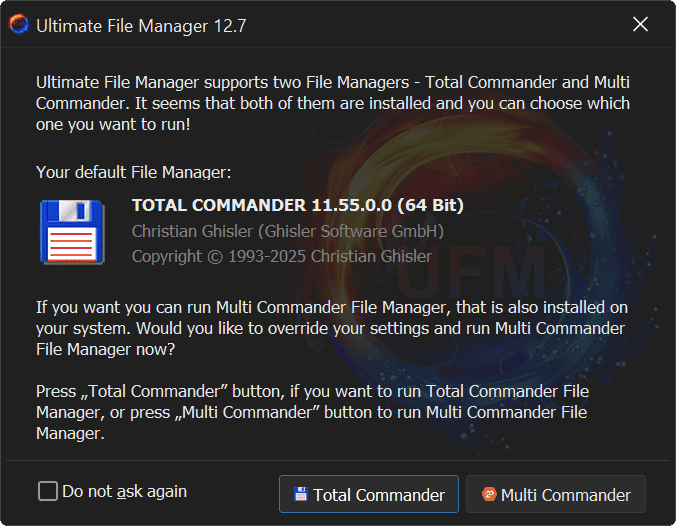
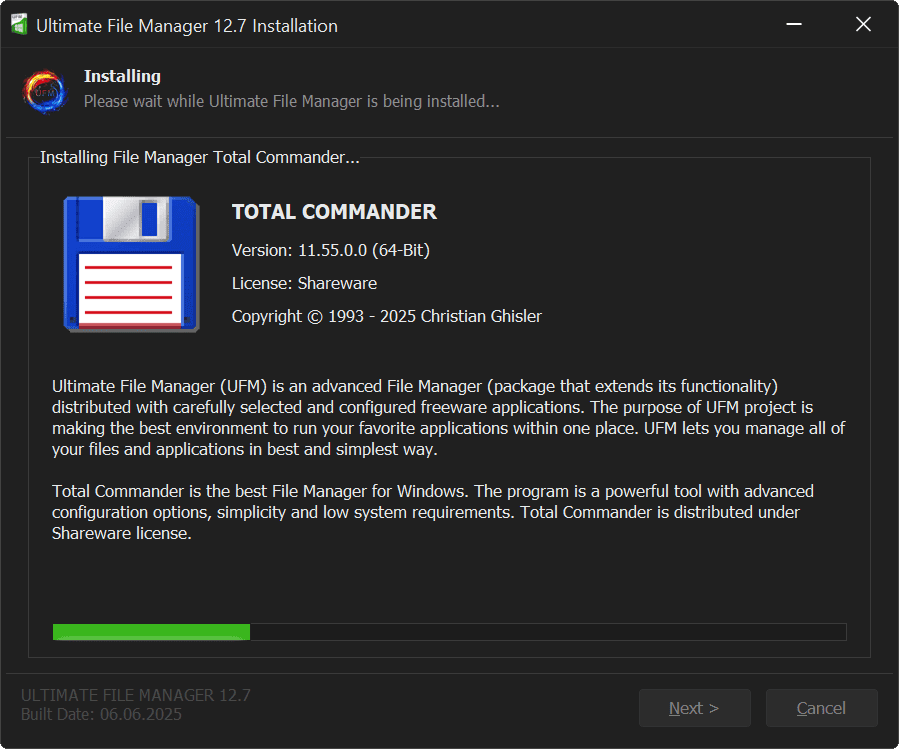
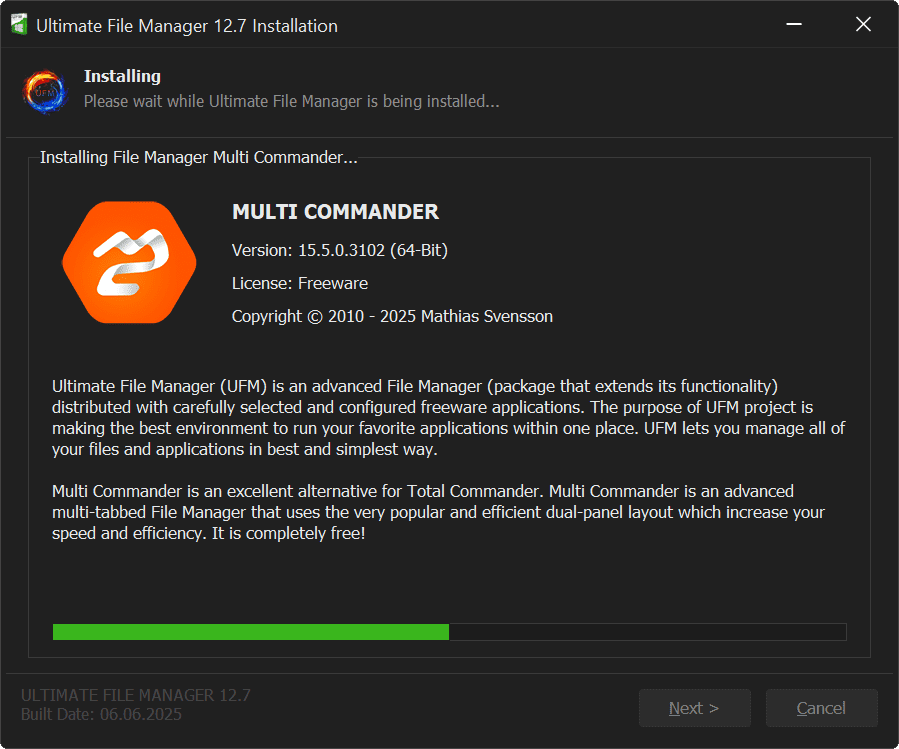
5. FILE MANAGER
Next page of UFM Installer is File Manager selection page - the central application of the Ultimate File Manager. Ultimate File Manager supports both of two best file managers for Windows. We are talking about the well-known and respected Total Commander and its free alternative - Multi Commander. You can choose which one you want to use (you can install both at the same time!).
• Total Commander
Total Commander is the best File Manager for Windows. The program is a powerful tool with advanced configuration options, simplicity and low system requirements. Total Commander is distributed under Shareware license.
• Multi Commander
Multi Commander is an excellent alternative for Total Commander. Multi Commander is an advanced multi-tabbed File Manager that uses the very popular and efficient dual-panel layout which increase your speed and efficiency. It is completely free!
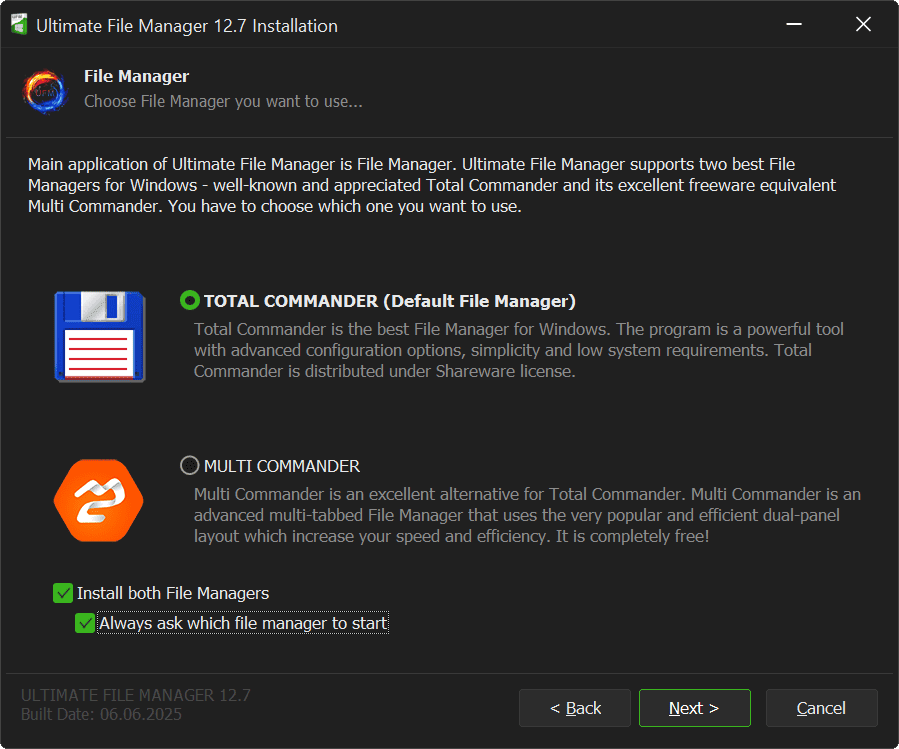
If you install both file managers, you can decide each time (when starting the file manager via UFM Launcher) which one you want to use (you can change this at any time in the UFM Settings application).
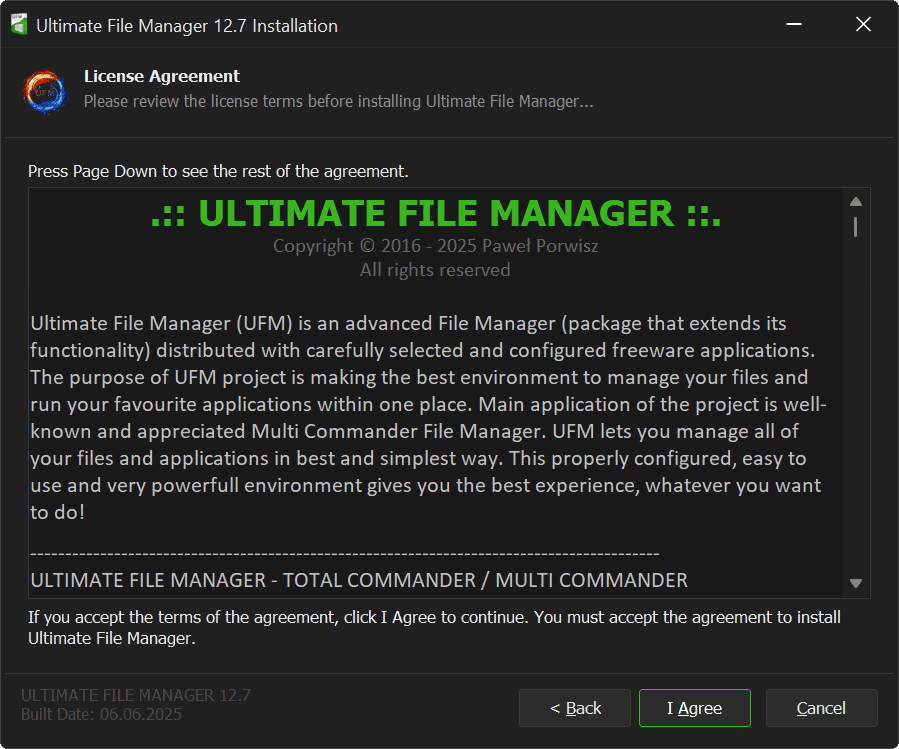
6. LICENSE AGREEMENT
Next page of UFM Installer is the page where the license terms are presented. The license text contains information about the type of software being installed, a short description of the components being installed, the license terms (Ultimate File Manager itself and File Managers) and contact information. Project authors and translators are also indicated. System requirements and tools used to create the installer are presented.
It is recommended to read this text carefully. After reading its terms (and accepting them), we proceed by clicking the „I agree” button or end the installation if the license terms do not suit us.
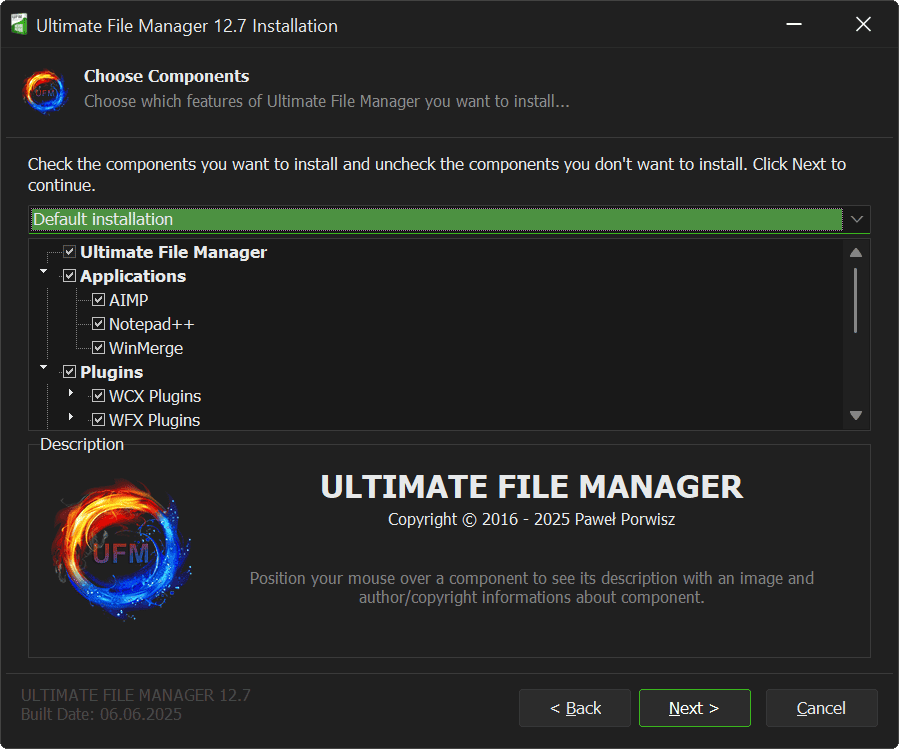
7. COMPONENTS PAGE
Next page of UFM Installer is Ultimate File Manager Components Selection page. You can select the ones you want to install and deselect the ones you don't want to install.
UFM installer comes with several predefined installation types:
- Default Installation - Typical installation recommended for all
- Full Installation - All available components are installed
- Minimal Installation - Only the necessary components are installed
- For commercial use - Components that prohibit commercial use are not installed
- User - The user decides what they want to install
Components tree displays all available components of Ultimate File Manager. These are Ultimate File Manager files, external program files (divided into several categories), and File Manager plug-ins and add-ons files (if you chose to install Total Commander File Manager).
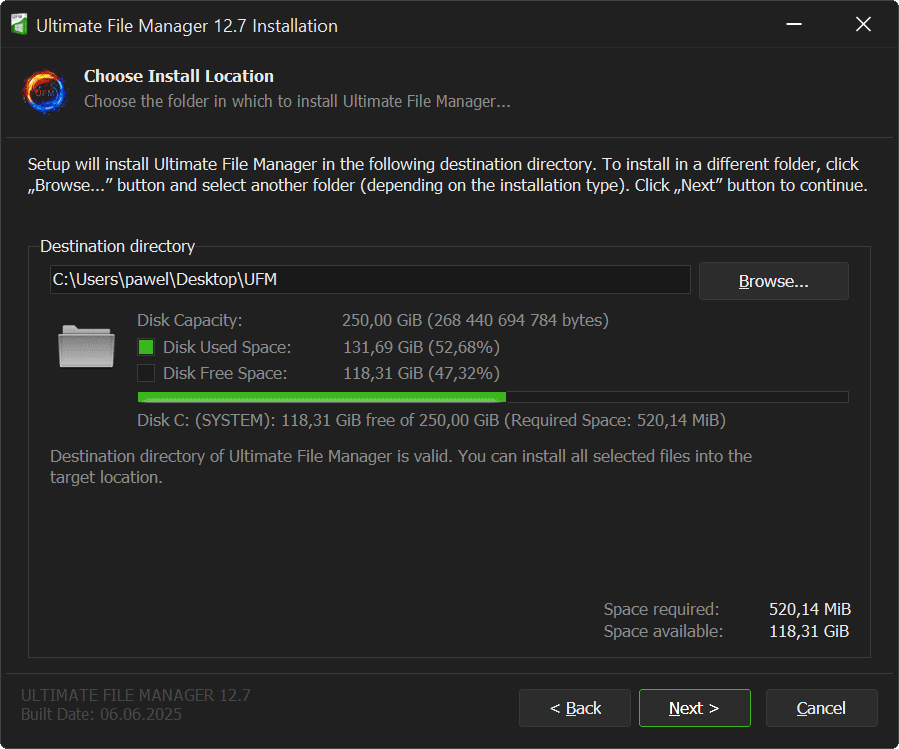
8. INSTALLATION DIRECTORY
Next page of UFM Installer is the installation location selection page. The installation directory is the directory to which all the Ultimate File Manager files are copied. Depending on the type of installation and user preferences, it can be located in a different place. The installer proposes a default installation directory and informs about the space required to copy the files and the space that is available in the given location.
■ Standard Installation
For the Standard Installation, the project files have been separated into two directories, depending on their purpose.
- Installation Directory - contains the project's executable files (%ProgramFiles%\UFM)
- BIN directory - binary files (exe) of UFM project tools
- LIB directory - library files (dll) of the UFM project
- Execution files - internal application files of the UFM project
- Text files - license, changelog and directory settings files
- Data Directory - contains user files (%LocalAppData%\UFM)
- APPS directory - external applications of the UFM project
- CACHE directory - cache files
- LOG directory - installation log files
- MC Directory - Multi Commander File Manager Files
- TC Directory - Total Commander File Manager Files
- TEMPLATES directory - template files (UFM Directory Manager)
- LANG catalog - UFM project language files
- DATA directory - data files (Clipboard)
- Configuration files - configuration files for the UFM installer and internal applications
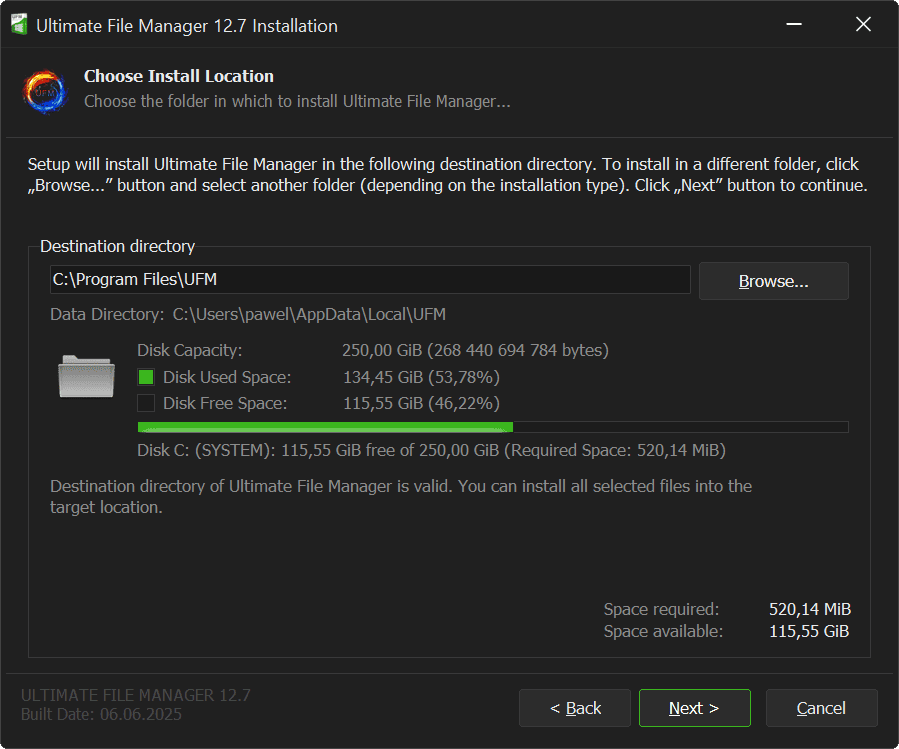
All project's executable files are installed by default in the C:\Program Files\UFM directory. User can change this directory to any other during installation. All other files that require data to be saved are installed in the user's local directory C:\Users\User_Name\AppData\Local\UFM. This directory location cannot be changed.
A special case is Update Mode of Ultimate File Manager project. It only applies to the Standard Installation, when a previous version of Ultimate File Manager is already installed on the user's disk. In this case, the installation directory cannot be changed. The existing installation directory (and the existing Data Directory) are used!
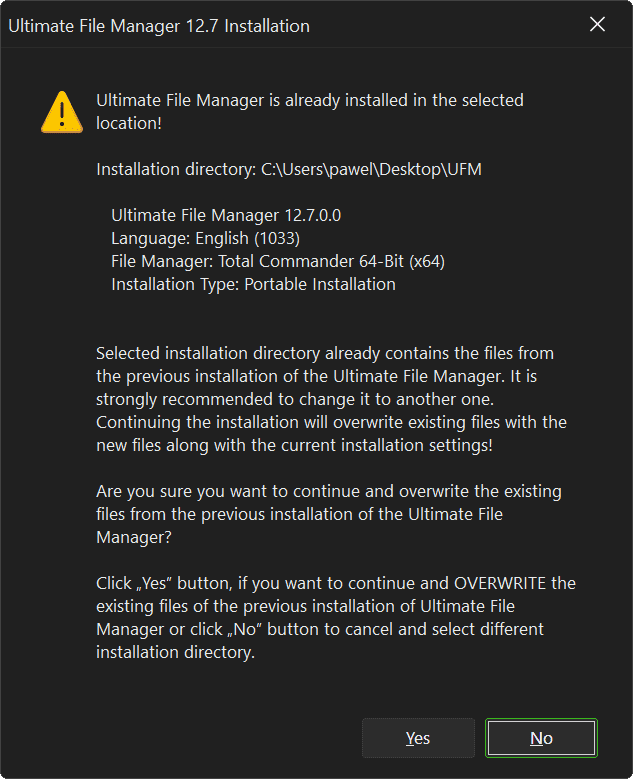
■ Portable Installation
In Portable Installation, all files are installed into one directory (this directory must have write permissions!). The default installation directory is C:\Users\User_Name\Desktop\UFM. Portable installation does not interfere with the operating system (does not create shortcuts, links, etc.).
Note
It may happen that you want to install Ultimate File Manager into an existing location (where the older Ultimate File Manager files are already located). In portable installation mode you can do this - but it has some consequences - all older files and all existing settings will be OVERWRITTEN by newer files and default settings. Therefore, you will be informed about it in advance and you must agree to it. It is recommended to simply change the installation location.
9. PROCESS MONITOR
Next page of UFM Installer is Process Monitor page, which checks if Ultimate File Manager or any of its components (file manager, application or tool) are not running in the background. To ensure proper installation, you must close all running processes of Ultimate File Manager from the list before continuing the installation.
The list of processes to close shows the process name, type, and PID (process number in the operating system). The full path to the executable file that is blocking the installation is also displayed. Clicking the „Close” button will immediately close all active processes in the list (those launched from the directory of the existing Ultimate File Manager installation).

Note
Before you close applications blocking the installation, remember to save all unsaved documents and end all ongoing operations in the running file manager!
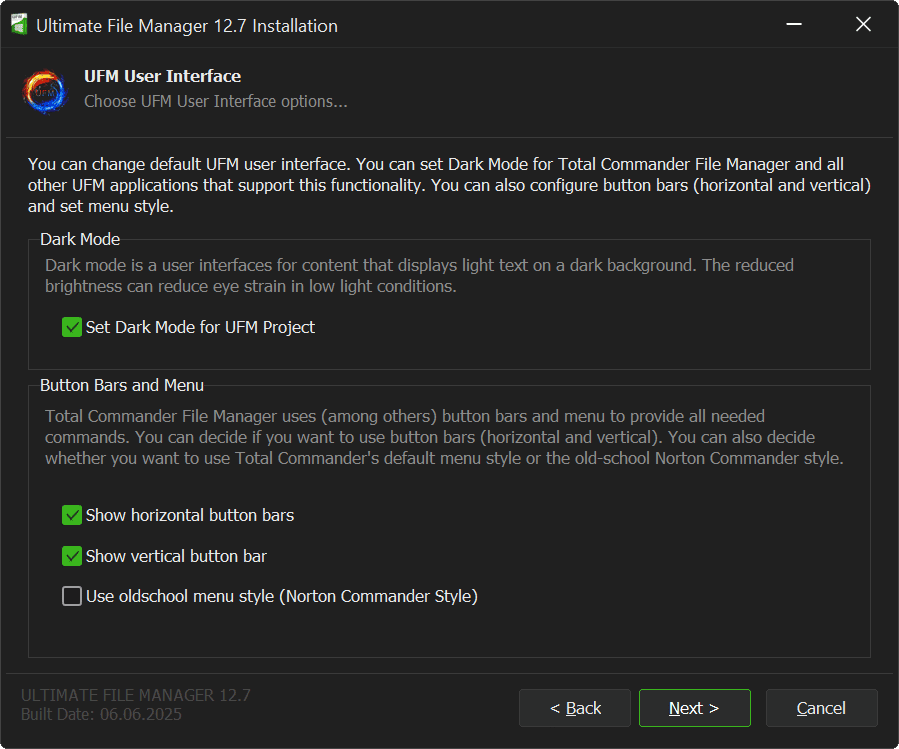
10. UFM USER INTERFACE
Next page of UFM Installer is User Interface options page. You can change the default UFM user interface. You can set Dark Mode for selected file manager and other applications that support this functionality. You can also configure the button bars (horizontal and vertical) and set the menu style for the Total Commander file manager.
Dark Mode
You can set Dark Mode for UFM file manager and apps. Dark Mode is user interface for content that displays light text on a dark background. Reduced brightness can reduce eye strain in low-light conditions.
Button Bars and Menu
Total Commander file manager commands are available through button bars and menus, among other things. You can decide whether you want to use button bars (horizontal and vertical). You can also decide whether you want to use default Total Commander menu style or the old-school Norton Commander style (menu with commands for the Left and Right Panes).
Note
Ultimate File Manager installer uses the operating system theme. All options to show/hide button bars and Menu style are only available when Total Commander file manager is installed. You can change all Ultimate File Manager interface options at any time using UFM Settings application.
11. UFM COLOR THEMES
Next page of UFM Installer is the page for selecting predefined color schemes for Ultimate File Manager. You can change the appearance of Total Commander or Multi Commander file manager by changing its colors using so-called color schemes. Color schemes define the color of fonts, background, highlight, cursor, etc. They are simply configuration files in text format that define colors and options related to the file manager interface.
• If you want, you can also use different font colors for different file types (a file type or file format is a set standard for recording information in a file. The way information or data is encoded depends on the application used. The file format is determined by its extension). For example, executable files (.exe) will be displayed in dark green, music files (.mp3) in orange, and graphic files (.jpg) in green.
• If you want, you can also highlight recently used files in a different font color (the default color is pink, the highlighting time is 10 minutes (for Total Commander file manager, and 1 hour for Multi Commander file manager).
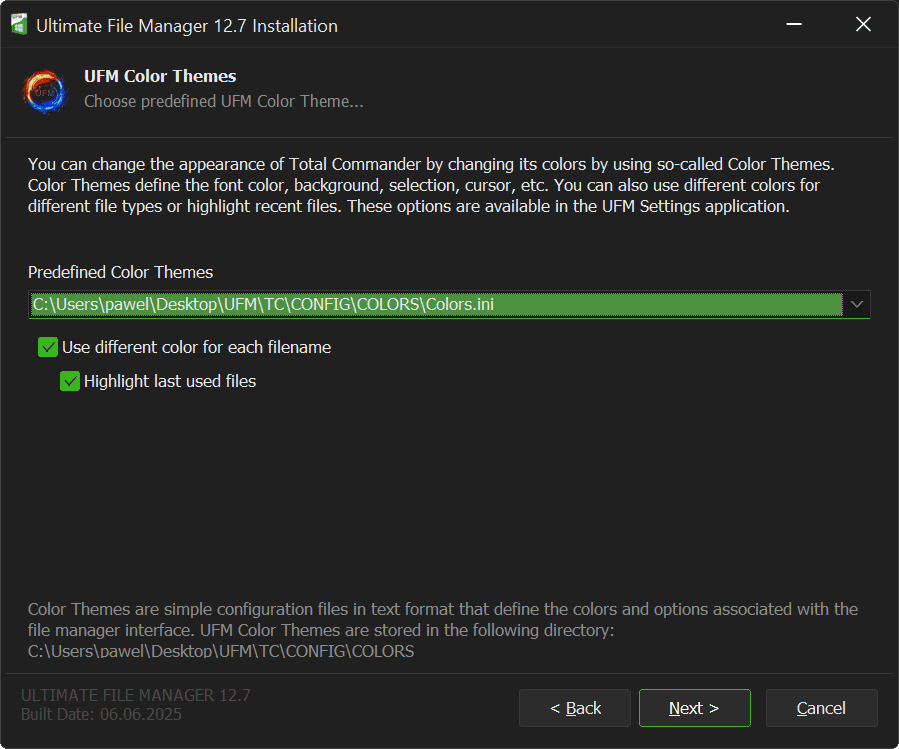
In Standard Installation, the predefined Color Scheme files are stored in the Data Directory. For Total Commander file manager , this is C:\Users\User_Name\AppData\Local\UFM\TC\CONFIG\COLORS, and for Multi Commander file manager , this is C:\Users\User_Name\AppData\Local\UFM\MC\Config\ColorRules.
In Portable Installation, the predefined Color Scheme files are stored in UFM Installation directory. For Total Commander file manager, this is by default C:\Users\User_Name\Desktop\UFM\TC\CONFIG\COLORS, and for Multi Commander file manager, this is C:\Users\User_Name\Desktop\UFM\MC\Config\ColorRules.
Note
You can change all Ultimate File Manager predefined color scheme options at any time using the UFM Settings application. Total Commander and Multi Commander file managers provide an interface for defining your own colors.
12. UFM ICON LIBRARIES
■ This page is only available if you have Total Commander File Manager installed.
Next page of UFM Installer is the UFM predefined icon library selection page. You can change the look of Total Commander file manager by changing the icons that are stored in the icon libraries. You can change the default button bar and menu icons, you can change the default drive bar icons, and finally you can change the file list icons.
- UFM Button Bar Icon Library - Default Button Bar and Menu Icons
- UFM Drive Bar Icon Library - Default Drive ComboBox Icons)
- UFM File Icon Library - Default icons for file list
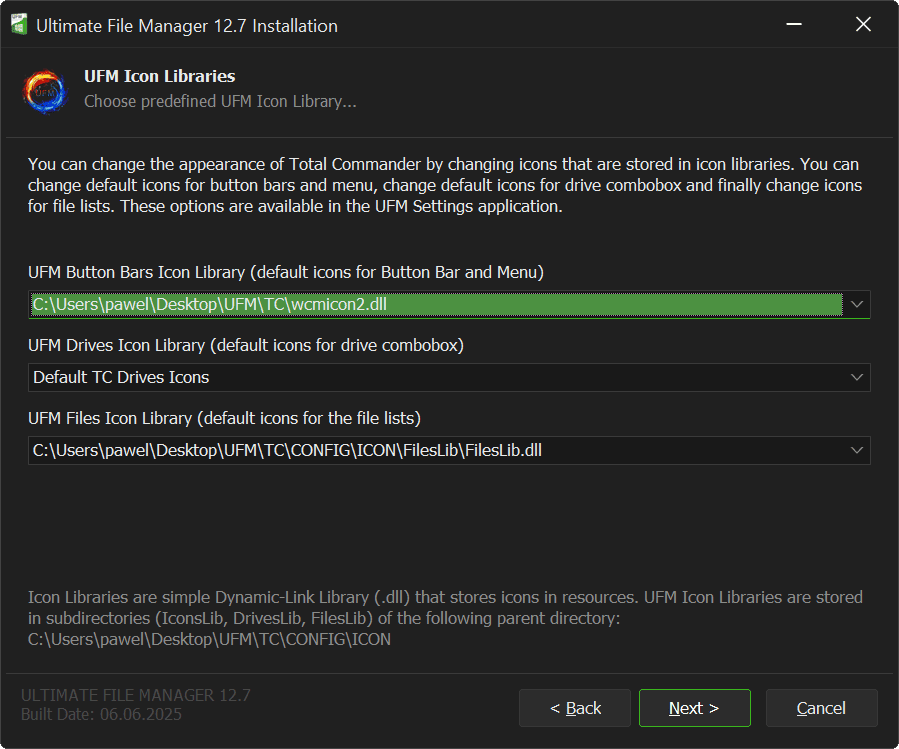
Icon Libraries are simple Dynamic-Link Library (.dll) that stores icons in resources. UFM Icon Libraries are stored in subdirectories (IconsLib, DrivesLib, FilesLib) of parent directory. Location depends on the type of installation.
In Standard Installation, UFM predefined icon library files are stored in Data Directory: C:\Users\User_Name\AppData\Local\UFM\TC\CONFIG\ICON. In Portable Installation, UFM predefined icon library files are stored in installation directory: C:\Users\User_Name\Desktop\UFM\TC\CONFIG\COLORS.
Note
You can change all options of Ultimate File Manager predefined icon libraries at any time using the UFM Settings application.
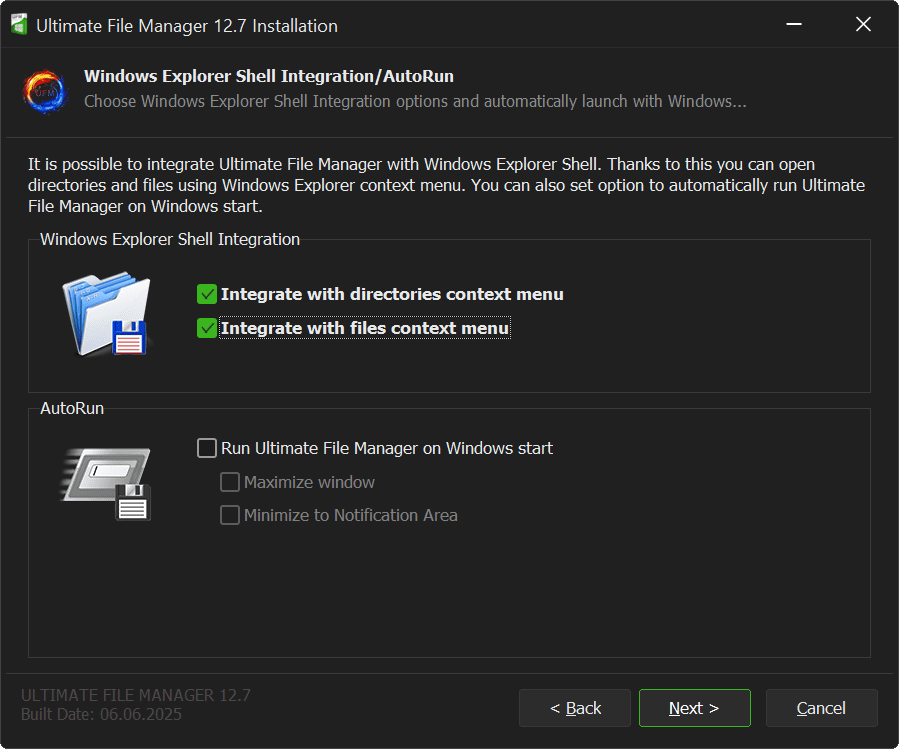
13. UFM SHELL INTEGRATION / AUTORUN
Next page of UFM Installer is the page for integrating Ultimate File Manager with Windows Shell (File Explorer) and Autoruns with Windows.
■ This page is only available for Standard Installation (integration with operating system).
• You can integrate Ultimate File Manager with Windows Shell (File Explorer), allowing you to open directories and files using Windows File Explorer context menu (this functionality is supported by the UFM Shell Extension Library (UFMShell.dll). Note that in Windows 11, UFM context menu options are available by right-clicking on the file/directory and expanding the menu using "Show more options" command.
• You can also set option to automatically start Ultimate File Manager when Windows starts (you can also decide whether the file manager window should be maximized or hidden in the Windows Notification Area).
Note
You can change the Windows Shell Integration / UFM Autorun options at any time using the UFM Settings application.
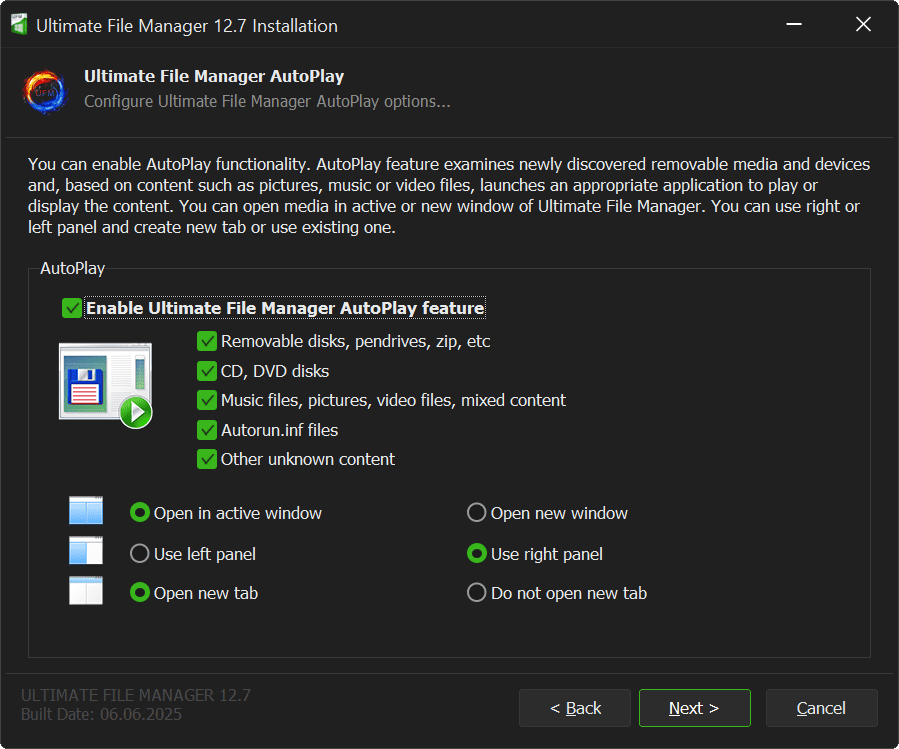
14. UFM AUTOPLAY
Next page of UFM Installer is the Ultimate File Manager Autoplay Page.
■ This page is only available for Standard Installation (integration with operating system).
Ultimate File Manager supports Windows AutoPlay functionality. AutoPlay primarily checks newly detected removable media (such as removable drives, pendrives, zip drives, CD/DVDs, etc.) and devices. Based on their content (these can be images, music files, or video files), it launches the appropriate application to play or display content.
• Autoplay content can be opened in the active file manager window (if it is already open) or in a new file manager instance (default).
• You can also define in which file manager pane the autoplay content should be opened - it can be the left pane or the right pane (default).
• You can also define whether you want autoplay content to open in a new tab (default) or just use the current tab.
Note
You can change UFM Autoplay options at any time using the UFM Settings application.
15. UFM SHORTCUTS
Next page of UFM Installer is Ultimate File Manager Shortcuts Page.
■ This page is only available for Standard Installation (integration with operating system).
If you want, you can create shortcuts that will launch Ultimate File Manager. You can choose where you want to create these shortcuts and you can pin Ultimate File Manager icon.
• You can create shortcuts in Windows Start Menu
• You can create application shortcuts in Windows Start Menu
• You can create a shortcut on your Desktop
• You can create a shortcut on QuickLaunch Bar
• You can also pin Ultimate File Manager icon in Quick Access Bar
• You can also pin Ultimate File Manager icon in This PC View
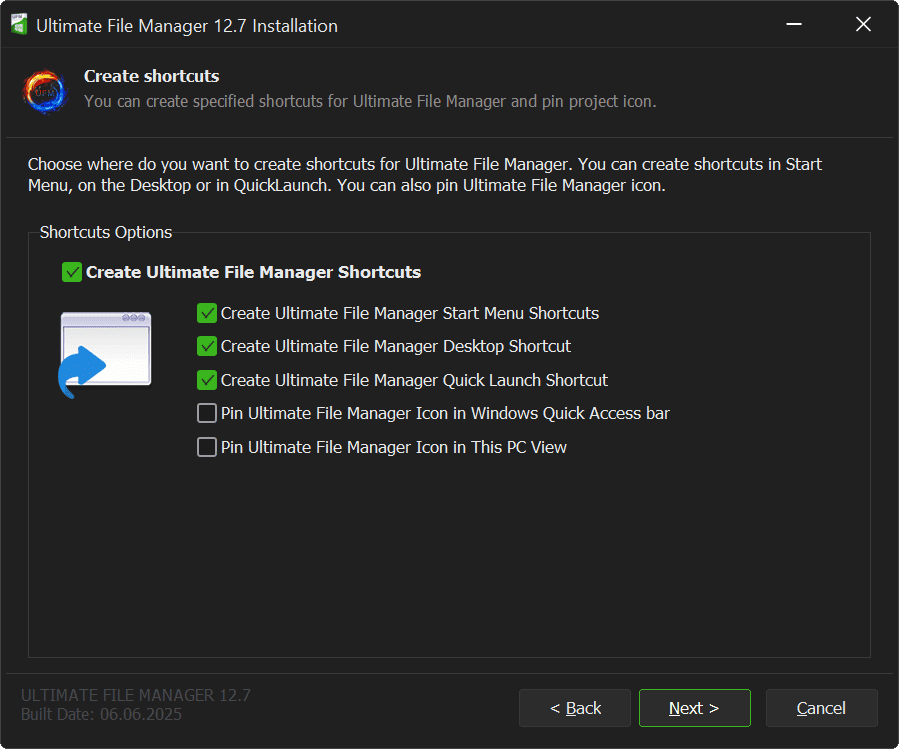
Note
You can change UFM shortcut creation options at any time using the UFM Settings application.
16. SUMMARY
Next page of UFM Installer is Installation Options Summary Page. You can review them and possibly modify your previous selections. The following information is available:
• Installation Type (Standard Installation or Portable Installation)
• File Manager Type/Architecture (Total Commander and/or Multi Commander x64)
• Installation Directory and Data Directory (in Portable installation it is the same directory)
• All external applications to be installed (name and version number)
• All Total Commander File Manager plugins (if selected for installation)
• UFM Interface Settings
• UFM Interface Color Settings
• UFM Icon Library Settings (Total Commander only)
• Windows Shell Integration/AutoRun Settings (Standard Installation only)
• UFM AutoPlay Settings (Standard Installation only)
• UFM External Applications AutoPlay Settings (Standard Installation only)
• UFM Shortcuts Settings (Standard Installation only)
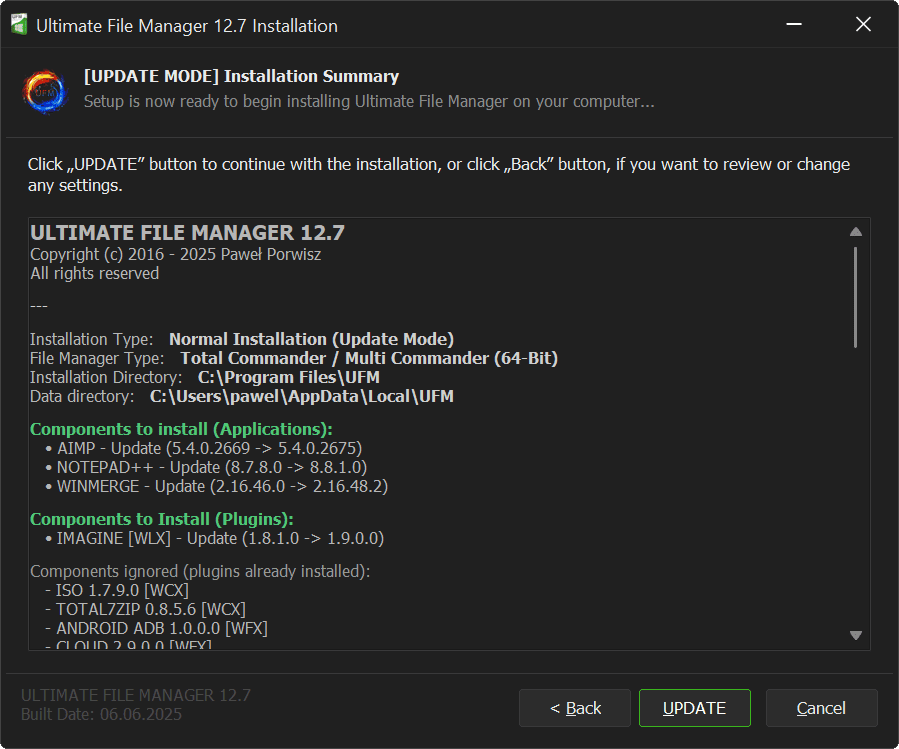
In Ultimate File Manager Update Mode, Summary Page also displays Installation Update status of UFM third-party applications and Total Commander File Manager plugins.
All components that will be updated are displayed (older version of already installed application/plug-in will be replaced with a newer version) and the components that will be removed (installed applications/plug-ins will be removed from the system). Ignored components section displays all those that have not changed (installer will skip them). The changes are illustrated by the version number (older and newer).
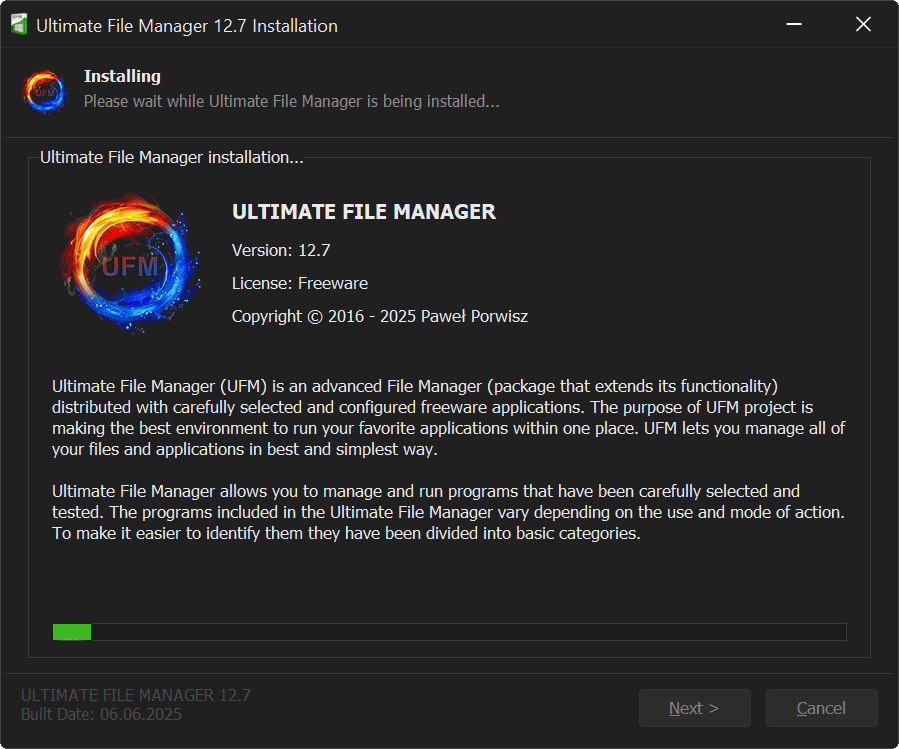
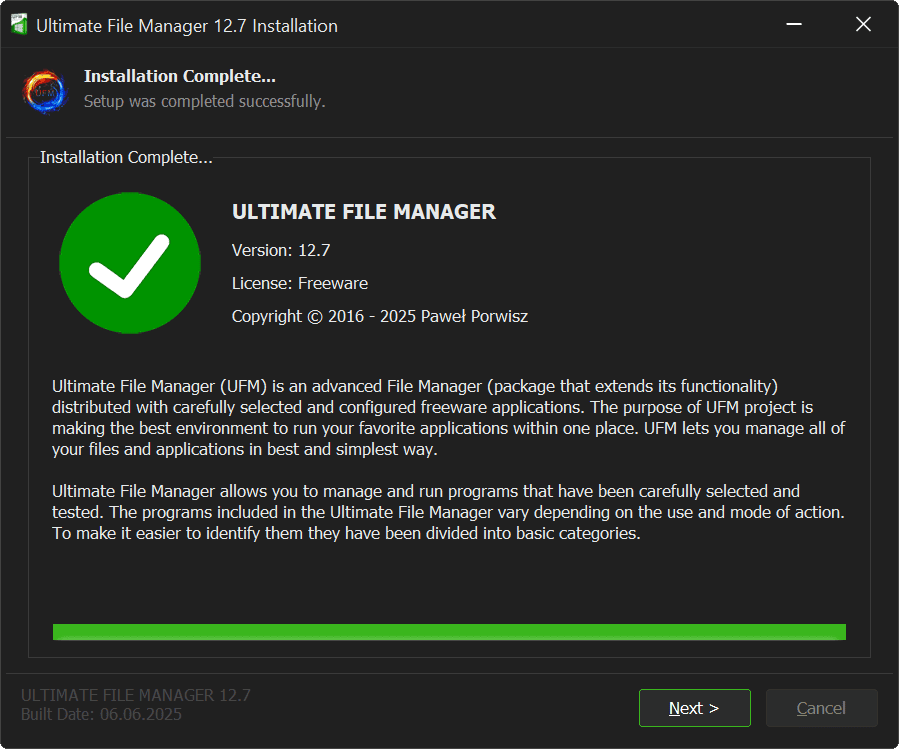
17. UFM INSTALLATION
Next page of UFM Installer is the UFM Installation Page. All required files are copied to the user's disk and predefined settings are saved. Appropriate configuration files are also created, depending on the selected options. This may take a while...
18. DONATION
Next page of UFM Installer is the page that allows you to financially support the project - just click the DONATION REQUEST button and you will be redirected to the financial support page, which provides all the information and methods of support. Yes, I know - another page to click through, someone wants money again! I understand you! Nevertheless, I ask you, dear user, for a moment of reflection and consider Financial Support for the project. It is unfortunately necessary.
Ultimate File Manager project is available completely free of charge. It will never change. Its creation is a great adventure and gives a lot of satisfaction - but it requires a lot of time and money. If you want, you can support the development of this project. You can make it even better. I have lots of ideas and lots of things to do!
THAT'S WHY I AM ASKING YOU TO HELP ME OUT. PLEASE CONSIDER MAKING A DONATION! EVEN A SMALL DONATION IS A LARGE MOTIVATION TO KEEP ME WORKING! YOU CAN USE SEVERAL CONVENIENT AND FAST METHODS TO DONATE. HELP KEEP THIS PROJECT ALIVE! THANK YOU FOR YOUR UNDERSTANDING.
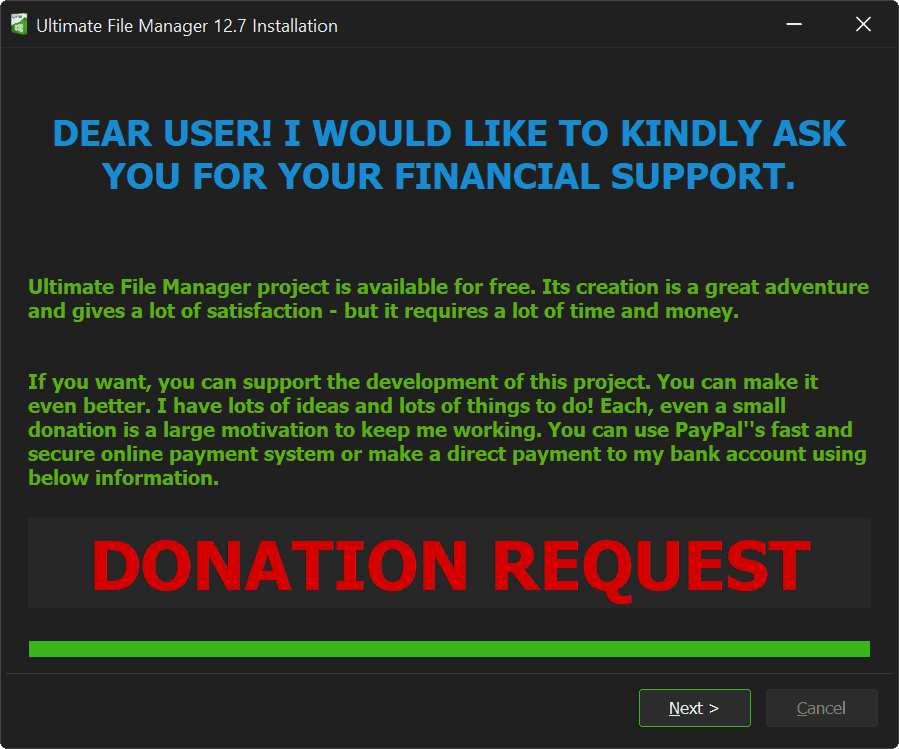
Note
It is possible to proceed further after a short period of time (10s) has passed. I know that this method of attracting the user's attention can be a bit annoying and inelegant - but I hope you understand. Unfortunately, it is necessary (because most of you simply click next) - you know how it is.
19. FINSIH PAGE
The last page of UFM installer is Finish Page. It provides information about the installation status and allows you to perform some basic actions after closing the installer window. You can:
• Run Ultimate File Manager (default)
• Run the UFM Settings application (Portable Installation) or UFM Shell Integration (Standard Installation)
• Visit UFM Homepage
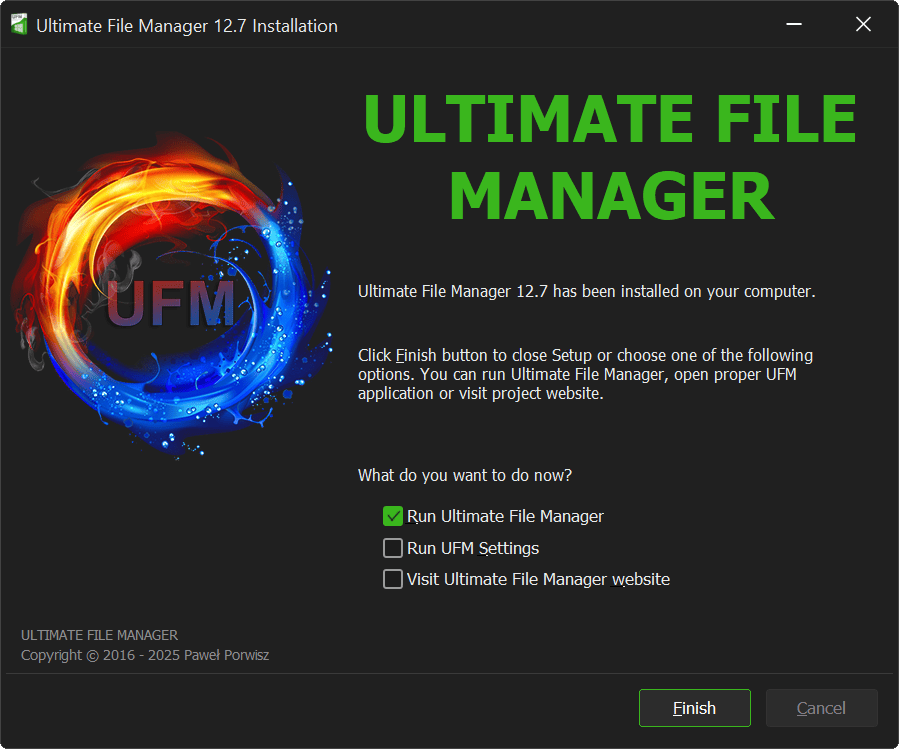
Clicking „Finish” button closes the installer window and completes installation process. If there are any actions marked to be performed, they will be performed. That's it! You are now ready to use the best File Manager for Windows!
If you have decided to install both file managers, before launching any of them you will see a file manager selection window (by default, the one you selected as default during installation will be selected).